No products in the cart.
General
My Roof Window is Leaking – why?

24
Sep
Sep
My Roof Window is Leaking – why?
This article is aimed not only at those who have had the unpleasant surprise of a leaky window, but above all at those who intend to install a roof window themselves but have no previous experience.
It should be mentioned at the outset that the problem of leaky roof windows is practically 100% due to incorrect window installation. Manufacturers supplying millions of windows to the market cannot afford even the smallest production error as it would result in huge financial losses.
It is essential to get acquainted with the basic parameters of the roof window during the purchasing phase. First of all, you should consider the size of the window, the roof pitch and the choice of proper flashing. Other parameters will mostly have an impact on the comfort of use and should not have an impact during installation.
It is also worth finding out whether you will need a top hung window, which may be required due to fire safety regulations.
Installation.
It is very important to read the instructions before installation, which may differ for different types of flashing. As well as the skylight installation instructions, window manufacturers will also provide
you with a video illustrating the installation process. However, the written installation instructions are essential – they will provide you with dimensions, for example, which will vary between different types of flashing.
Without going into the installation details, here is a list of what you should consider when installing a roof window.
– Window installation depth. The window’s outer frame usually has a groove (one or more) that points to the top surface of the roof. Make sure this is in the correct position according to the installation instructions.
– The outer frame after installation must not be crooked (all corners should be 90° exactly). This should be checked by installing the window in the frame immediately after fixing the frame to the roof using the brackets provided. Once the window is fitted into the frame, all spacing must be equal. This is a very important step during installation – a misaligned frame can result in a leaking window!
– The outer frame must be in a straight plane. None of the corners of the frame can be pressed or protrude above the plane of the window – this will result in the window not closing and eventually leaking.
– A collar is installed around the window frame, which is usually made of a vapour-permeable membrane. This flashing may be supplied with the window. If not, you should make it yourself. It should be made with care, ensuring that there is no possibility of water running under the bottom layers.
The installation of the roof window flashing should not present any significant problems. Remember that all parts should fit perfectly – if two pieces do not fit together or need to be modified, take a step back and re-examine the instructions. A well-chosen flange should not require modification. It is widespread for companies to supply a universal flashing that fits most roofing materials, but this may sometimes require minor modifications depends on roof material. If this is the case, ask your dealer or technical support.
The first verification of the installation usually comes during the first rainfall. It should be mentioned here that the wind strongly influences window leaks, which can transport moisture inside.
Unfortunately, my window is leaking. Where do I start?
Pitch roof windows can leak in three different areas.
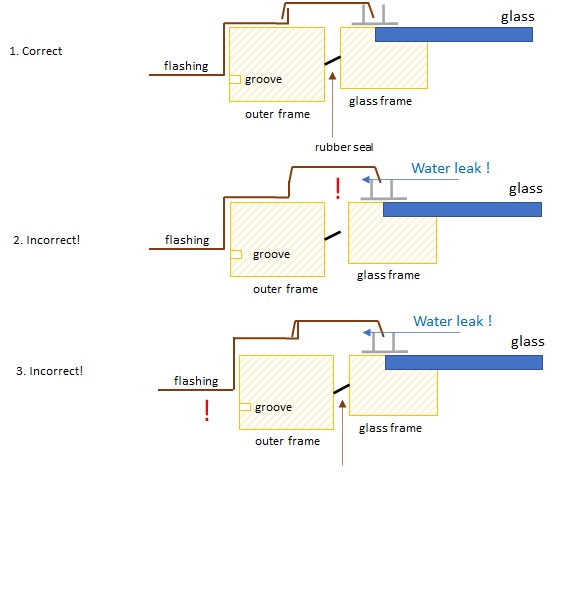
Fig 1. Correct and incorrect installation
- Between the glass and the inner frame
Such leakage could indicate a manufacturing fault in the roof window. If you analyse the construction of the window, you will see that between the glass and the inner frame, there is usually a black bitumen compound. A lack of this could cause such a leak. In this case, water should accumulate in one of the lower corners of the glass. As I mentioned earlier, a manufacturing defect is very, very rare. So, what is the explanation for water pooling? A very similar effect can be observed during condensation on the glass. This very often happens in freshly plastered, poorly ventilated rooms where water vapour that cannot escape settles on the glass and flows into the corners of the skylight, raising a false alarm.
- Between the outer and inner door frame
The most common case is leakage between the outer and inner frames. Roof windows are manufactured with tongue and groove technology, which works 100% well provided the window is installed correctly.
Leakage between the frames results in water collecting mostly in the bottom corner or around the handle if this is located in the bottom area. After opening the window, you can see traces of moisture on the inner and outer frame, which after accumulation condenses and flows down the rubber gasket (placed between the frames, the gasket plays the role of a thermal seal and does not prevent the window from leaking as many users believe) to the bottom part of the window where it flows out in the corners or around the handle.
The reason for the leak may be:
– An outer door frame that is crooked in relation to the window. This manifests itself as uneven gaps between the frames, as shown in the picture below.
– An outer frame is not installed flush with the window frame (one or more corners of the window may be lowered or raised relative to the others).
This can result in additional resistance when closing or even in the inability to close the window.
In both cases, the tongue will not be able to find its way into the groove and water will leak into the window structure.
To prevent leakage in these cases the outer frame if the rooflight must be readjusted. In order to do this, you will need access to the window mounting brackets, which are located on the outside. You will need to remove the external flashing parts, such as the tiles, which are located directly around the window.
– On some window models the aluminium flashing parts are fixed to the frames with screws or plastic fixings. Unscrewed screws or loose fixings are the ideal place for water to penetrate inside the window structure, and it then flows downwards causing exactly the same effect as the above two cases.
- Around the outer frame of the roof window.
Leaks that which only occur around the window (outside the frame), on the wall or on the wall, can be the result of poor installation of the membrane flashing around the window or aluminium flashing. It is also possible that water leaking from other parts of the roof may be trapped in the window area, giving false leakage marks around the window.
It is also important to ensure that the sponges between the flashing and the roof covering are positioned correctly, as they may leak in high winds, which can carry moisture.